How to profile your PHP applications with Xdebug
Vincent Brouté • May 5, 2022
phpCode profiling is a practice that is worth to be known when you need optimize your application to make it meet some performance requirements. It might even become your best fellow when it comes to solve efficiently some performance issues, either in terms of time consumption, processor usage or memory usage.
Profiling tools allow you to collect detailed performance metrics from a code execution in order to further analyse them through a visualization tool. The main purpose of this kind of practices is to ease the find of performance bottlenecks in your code. In the PHP ecosystem, there are several tools available to perform code profiling.
We will focus on Xdebug in this post, and I may release a second post about Blackfire later. In the meantime, feel free to dig into the other available profiling tools.

We can learn from the insightful survey from JetBrains released in 2021 that Xdebug is the most popular tool with 20% of usage among all the other tools to perform code profiling or performance measuring (which also include tools like APM or HTTP load bench). Blackfire reaches a solid 7% of usage. The survey highlights that there is also plenty of developers - 18% - who collect their performance metrics right from the code, by setting manual timestamps for instance. It can obviously be an effective solution if you just need to profile a known-beforehand part of your code.
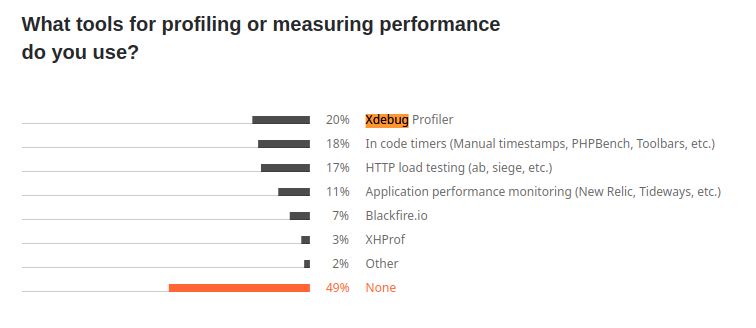
Tools used for profiling or measuring performance
Set up a PHP 8.1 environment
Before we can use profiling tools, we need to set up a minimalistic PHP environment with a sample application to profile. For the sake of simplicity, We will rely on docker-compose to achieve this first step - assuming you are already familiar with docker containers. The basic setup is available in this GitHub repository, and you are free to clone it to in order to do your own experiments. We will bootstrap a Symfony application to have something on which perform code profiling. Let's start with the basic docker-compose.yaml configuration file :
version: '3.7'
services:
  codeprofiling-php-fpm:
    container_name: codeprofiling-php-fpm
    build: php-fpm
    volumes:
      - ./:/var/www/codeprofiling

  codeprofiling-nginx:
    container_name: codeprofiling-nginx
    image: nginx
    ports:
      - "8080:80"
    volumes:
      - ./:/var/www/codeprofiling
      - ./nginx/codeprofiling.conf:/etc/nginx/conf.d/default.conf
Here, we define the only two services we need for our profiling purpose. The php-fpm service is built from a custom image defined in a Dockerfile that we will see right after. The Nginx service acts as our web server and allows us to query our PHP application through HTTP on the port 8080. Nginx requires a bit of additional configuration which is brought by the file codeprofiling.conf. Since this file is not very relevant for our profiling concern, we will skip it, but you still can take a look to the one I've set in the GitHub repository. You will notice in the configuration that Nginx communicates with php-fpm through the port 9000 which is the default port exposed by the php-fpm docker image. That's all for the docker-compose file for now, let's dive into the Dockerfile for the php-fpm service !
    FROM php:8.1-fpm

    ARG userid
    ARG groupid

    RUN apt-get update -yqq \
        &&  apt-get install -yqq git unzip

    COPY --from=composer:latest /usr/bin/composer /usr/bin/composer

    RUN curl -sS https://get.symfony.com/cli/installer | bash \
        &&  mv /root/.symfony/bin/symfony /usr/local/bin/symfony

    RUN groupadd -g $userid myuser \
        && useradd -m -u $userid -g $groupid myuser

    USER myuser

    RUN git config --global user.email "example@example.com" \
        && git config --global user.name "Example"

    WORKDIR /var/www/codeprofiling
The Dockerfile extends the PHP 8.1 basic image to add some extra steps : install basic tools like git and unzip, install Composer and Symfony CLI tools, create a user who will have the same UID and GID than the current host user. The initialization of GIT email and username is required by Symfony CLI tool in order to install the framework without any error.
Now that our docker-compose.yaml and Dockerfile files are set, we can finally build and run our services :
    docker-compose build --build-arg userid=$(id -g) --build-arg groupid=$(id -u)
    docker-compose up -d
The next step is about installing a blank Symfony application within the app/ subdirectory. Thanks to the Symfony CLI tool, it can be achieved by running a single command :
docker-compose exec -T codeprofiling-php-fpm bash -c "symfony new app --webapp"
If you now query http://localhost:8080, you should get this introduction page :
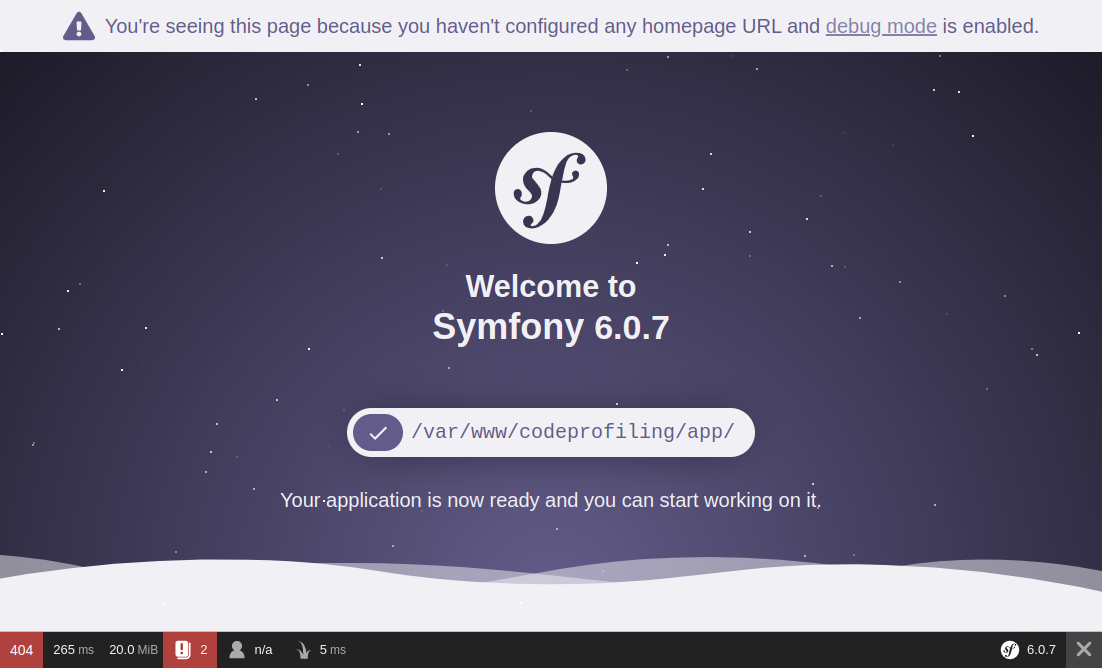
There is no need to set up some kind of "hello world" page with a custom route and a controller since we are able to analyze the execution of this already-working introduction page in depth with Xdebug. Now that everything is up, we can move on to the next step and install xDebug !
Code profiling with Xdebug
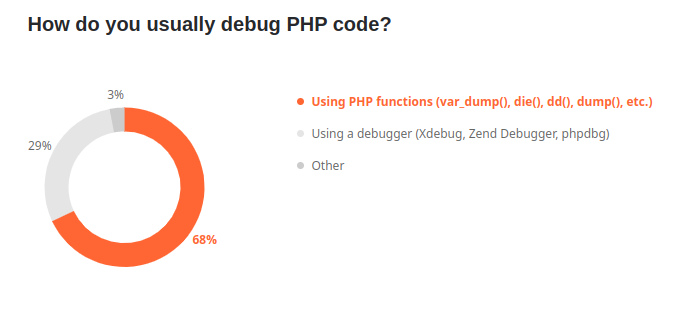
Xdebug is a widespread PHP extension of which the first version has been released in 2002. It's mostly used for its advanced debugging feature which provides step by step execution. According to the jetbrains survey, Xdebug is used by roughly 30% of developers who need to perform debug tasks. Most of us are actually var_dump() users. Looking at these figures, I guess there are even less developers who use Xdebug for code profiling purpose, although it's really a convenient tool !
Xdebug provides three modes that can be enabled independently. The debug mode allows you to run your code step by step by setting breakpoints. The develop mode brings more user-friendly var_dump() output and errors. Last but not least, Xdebug provides a profile mode that allows you to - you guessed it - analyze in depth the performance of your code.
Installation & configuration of Xdebug
If you want to jump directly to the final version of the PHP environment with xdebug ready-to-use, you can take a look at the "xdebug" branch from the GitHub repository. The installation of Xdebug PHP extension is pretty straightforward and can be achieved by adding this small bunch of lines to the Dockerfile :
RUN pecl install xdebug \
    && docker-php-ext-enable xdebug \
    && echo "xdebug.mode=debug,develop,profile" >> /usr/local/etc/php/conf.d/docker-php-ext-xdebug.ini \
    && echo "xdebug.start_with_request=trigger" >> /usr/local/etc/php/conf.d/docker-php-ext-xdebug.ini \
    && echo "xdebug.client_host=host.docker.internal" >> /usr/local/etc/php/conf.d/docker-php-ext-xdebug.ini \
    && echo "xdebug.output_dir=/var/www/codeprofiling/profiles" >> /usr/local/etc/php/conf.d/docker-php-ext-xdebug.ini
To clarify, we first install the Xdebug PHP extension through PECL before enabling it. The following lines aim to write the basic configuration into the file docker-php-ext-xdebug.ini.
In order to allow us to test all the features offered by Xdebug, we enable both the debug, develop and profile modes but since we will only use the 'profile' mode in this tutorial, we could have skipped the 'debug' and 'develop' ones. Pro-tip : if you want to collect very accurate performance metrics, you should consider disabling the "debug" mode as this mode adds overhead at runtime. In the same way, you should disable the garbage collector (see zend.enable_gc) to get more accurate memory usage data.
We set the xdebug.start_with_request option to trigger in order to run the profiling when a specific trigger is present in the request. Thus, Xdebug can be started by setting either a specific GET or POST variable, or even an HTTP cookie, we'll see it in action in the next part.
Setting xdebug.client_host isn't formally required for our profiling purpose. Still, if you want to take advantage from the debug mode, it's worth to be set. This option allows Xdebug to know the host on which it needs to establish a connection with your IDE. The default port for this connection is 9003, so you should ensure that your IDE listen the same port if you want to perform debugging.
The last xdebug.output_dir option is the most important one to make the profiling mode work. It allows you to set the directory in which the profiling files will be saved for further analysis. Xdebug actually just write a callgrind-formatted file, then that's up to you to open it with an appropriate tool. Since we run PHP into a docker container, this directory should be accessible both from the container and the host. That's why a directory within the project is a suitable location, but we could also have created a dedicated docker volume for instance. Besides, you need to ensure the proper rights are set so the PHP process can write into this directory.
Another last thing to add in the docker-compose.yaml file is the definition of the extra host host.docker.internal we used in the Dockerfile. As said before, this is not required for profiling mode but only for debug.
    extra_hosts:
      - "host.docker.internal:host-gateway"
That's it, now we are ready to perform our first code profiling !
Start code profiling from an HTTP request
If you remember, a specific trigger must be conveyed to the request to tell Xdebug to start the profiling. The trigger is XDEBUG_TRIGGER=StartProfileForMe, and it can be set either by a GET variable, a POST variable or even an HTTP cookie. So let's start a profiling by requesting http://localhost:8080?XDEBUG_TRIGGER=StartProfileForMe. If Xdebug is correctly configured, you should find an HTTP header in the response that points out where the profile file has been saved :
X-Xdebug-Profile-Filename: /var/www/codeprofiling/profiles/cachegrind.out.x
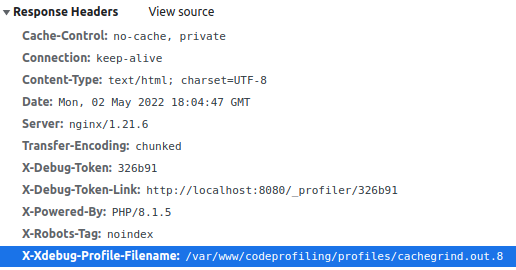
This file contains a text-formatted call graph of the functions call stack involved to render the page along with all the figures regarding execution time and memory usage for each call.
If you use PHPStorm, you're lucky because this IDE already includes a tool that allows you to visualize this kind of callgrind files. However, it's really a basic tool that brings only tabular views of the data. If you want a more advanced and user-friendly tool with a graphical view of the data, you should definitely head for KCachegrind.
Start code profiling from a command line application
Starting code profiling for command line applications is as simple as for web apps. Actually Xdebug can also be started by setting the trigger variable as an environment variable. So let's execute bash on the php-fpm service :
docker exec -it codeprofiling-php-fpm bash
We could for instance execute a command from the symfony console. We just need to add the XDEBUG_TRIGGER environment beforehand to start Xdebug along with the command. The new profile file should then be created within the profiles' directory.
XDEBUG_TRIGGER=StartProfileForMe php app/bin/console about
Analysing profiles with PHPStorm
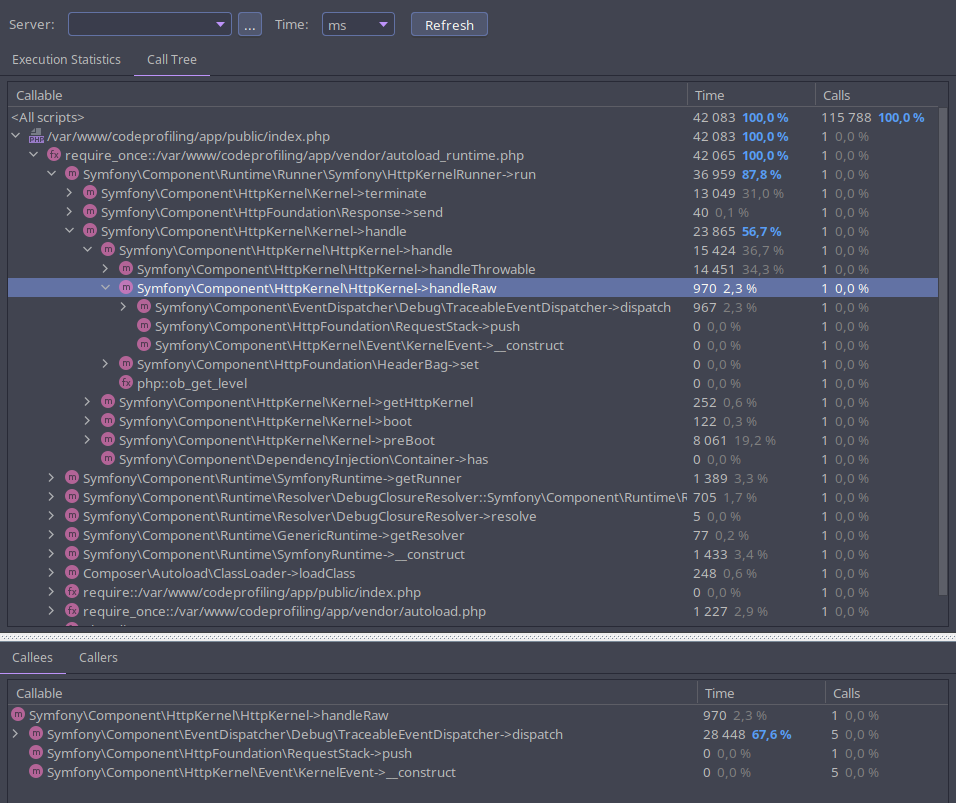
Simply go to Tools > Analyse Xdebug Profiler Snapshot and open the cachegrind.out.x file written by Xdebug. Here we are ! We can now explore all the performance metrics gathered by Xdebug. Within the "execution statistics" tab, we can easily list the most time or memory consuming calls, spot the most called functions, browse the callees and the callers of a specific function, etc.
Within the "call tree" tab, we can browse the execution graph by unfolding the calls with in a top-down approach.
Analysing profiles with KCachegrind
KCachegrind is old-school tool but a way more comprehensive than the built-in analyzer from PHPStorm. It provides two useful graphical views of the call stack that you can easily browse. First, a tree graph shows how the calls are related between them. On the other hand, a tree map shows the call hierarchy of the application with rectangles sized after a chosen metric value.
A search form will help you find for any specific call by function name. Moreover, you can group calls by classname or file to inspect the data from a different angle.
KCachegrind is available for Linux based operating systems. If you are using Mac OS X or Windows, you'll need to install Qcachegrind instead which is basically the same tool.
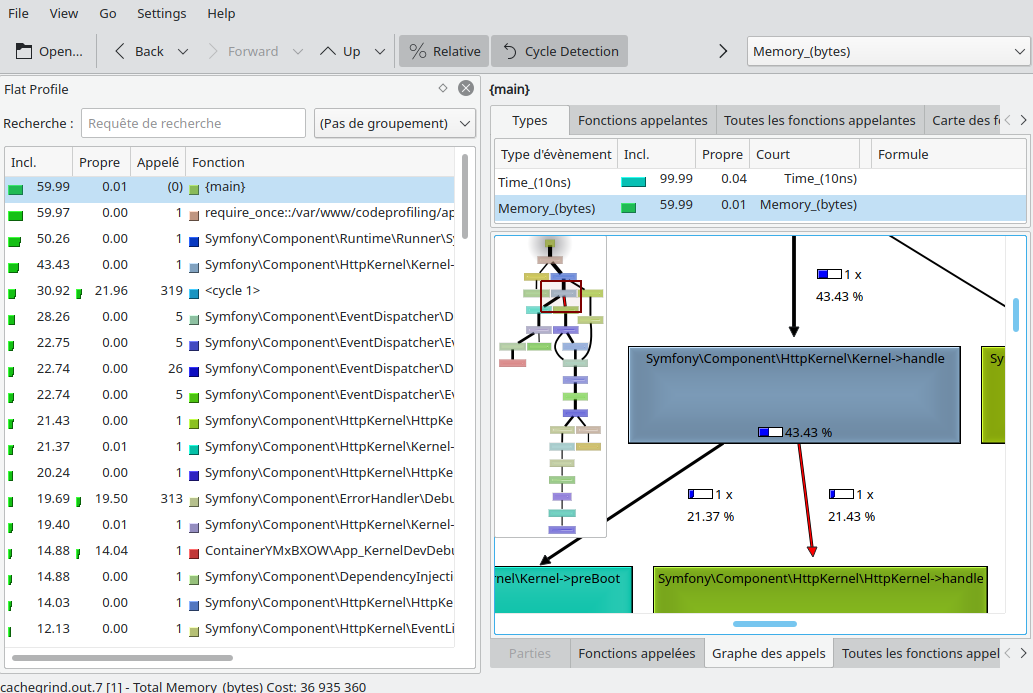
Browsing the tree graph
Would you want to gather more insights on Kcachegrind abilities before jumping in ? Here is great a video tutorial from Derick Rethans, the father of Xdebug, that explains more in depth all the data shown in the different tabs of the tool :
Now is the time for you to perform some profiling analysis on your own to become more familiar with the tool !
Wrapping up
You are now able to easily catch performance bottlenecks in your code thanks to Xdebug profile mode. I hope this little introduction has helped you to bring Xdebug into your real projects. Feel free to share the tools or the tricks you use to perform code profiling or to analyse the profiles. If you need deeper details on how xdebug works and all the options available, go to the Xdebug documentation. In a latter time, I may release another post focused on Blackfire. You should also consider this solution if you haven't yet. Blackfire is an awesome platform to get a detailed view of code performance through a modern dashboard. Besides, Blackfire goes far beyond just code profiling by providing a bunch of APM-like features.